In this article, we’ll cover how to hold off tickets and manually process transactions for Agencies. This option is referred to as working with Agencies Offline and is available as an alternative to selling tickets through Agents using the API.
Before starting, make sure you have read:
In this article, we’ll take you through the following steps:
Setting up Agency Locks
If you are selling Tickets through an Agency which does not use the API, then the easiest way to do this is to lock off an allocation of tickets on your Seating Plan. You can increase or decrease an allocation of Locked seats as needed.
In this section there are three steps:
Before setting up Agency Locks, we recommend having an agreement in place with the Agent you are working with about the number of tickets you wish to sell.
You’ll need to follow this process for each of the Agents you want to work with.
Creating new Lock Types
To set up Locks (sometimes referred to as an allocation, set asides, or holds) for an Agency, first go to the Admin Interface > Seating Plans > Locks.
Create a new Lock Type for each of the Agents you plan to work with. You can find out more about Locks in the Introduction to Locks and Setting Up and Editing Lock Types.
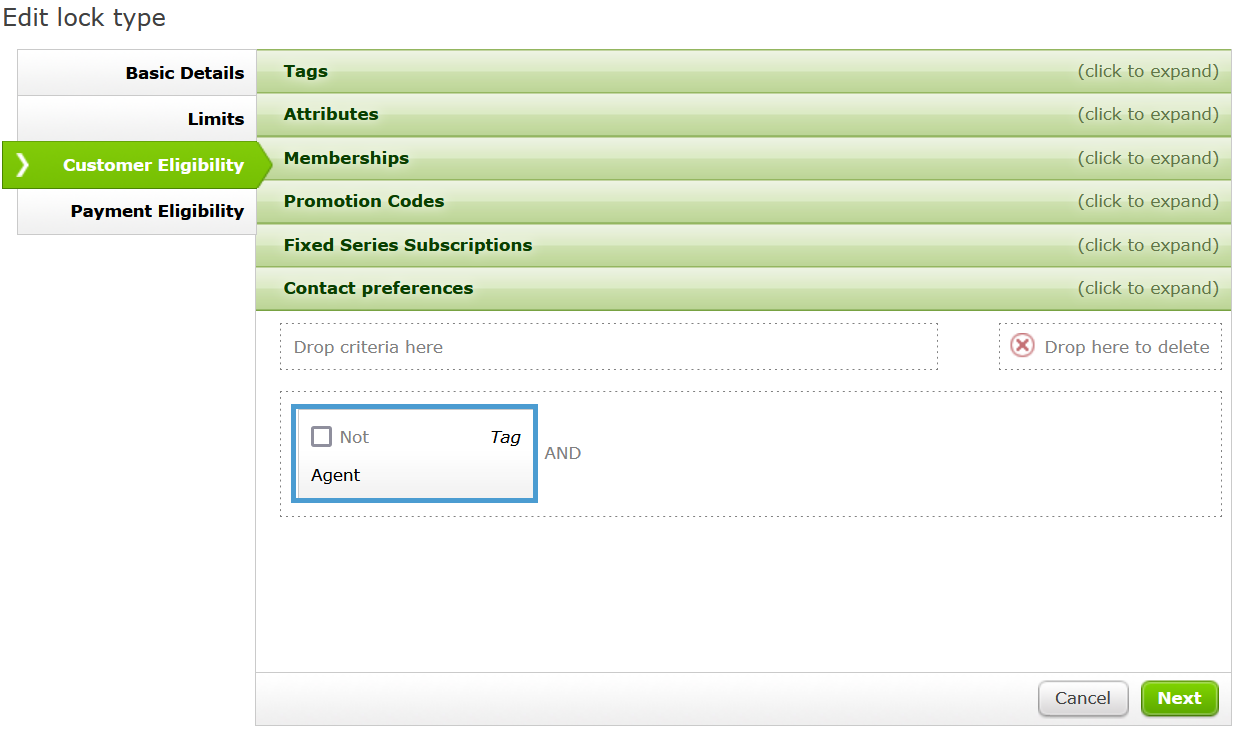
Limiting Access with Tags
You may also want to set Customer Eligibility using Tags or Attributes to limit the Locks to only those with the Agent Tag or specific Agents.
You can also create a Tag for each of the Agents you work with, limiting certain seats to specific Agents.
Applying a Lock Overlay
Next, you’ll need to apply a new Lock Overlay to each of the Events or Instances you plan to sell through Agents. You can choose to do this at the Global level (to all the Events using the Seating Plan), or, at the Instance level (to individual Instances).
Create a new Lock Overlay, or edit an existing one, for each of the Seating Plans you plan to use.
TIP: You’ll need to add a Lock Overlay for both Reserved and Unreserved Seating Plans.
Apply the Agency Lock Type to each of the seats you will be selling to each Agency in a reserved seating plan or assign a number of seats to the Agency Lock Type in an unreserved seating plan. Take a look at How to Create and Edit Lock Overlays for step by step guidance.
Once you have applied the Lock Overlay to your selected Events, you can sell tickets by processing a transaction selling the locked seats to the Agency.
Processing transactions
When working with Agencies offline, you’ll need to sell the locked seats to the Agent by following the steps below.
You might do this by selling all of the tickets you have allocated to the Agent in one Order.
REMINDER: Make sure you have already followed the steps in Setting Up Agencies before learning about how to process manually process transactions.
- Go to the Sales Interface.
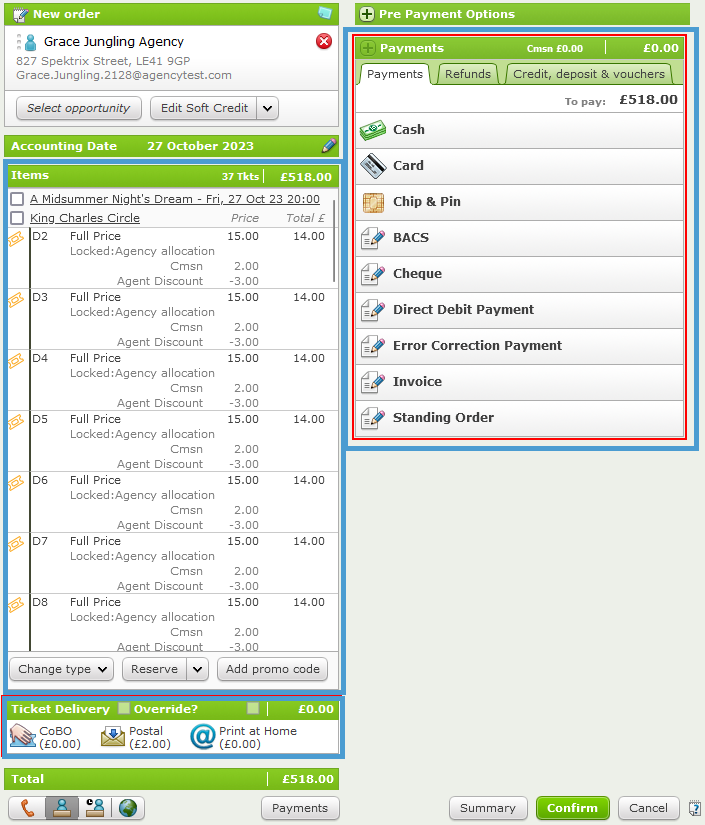
- As with a normal sale, choose the Event, Instance and add the specific Agent’s locked seats to the Cart/Basket.
- Next, find and add the customer record of the Agent.
If the tickets you have chosen are eligible for your Agent Commission structure, the Agent Discount will automatically apply when the customer record is attached.
The Agent Discount refers to the inside Commission rate which is the value that is retained by the Agent.
The Price column will show both the value of the ticket and the value of the discount. The Total column will show the amount you will be charging the Agent.
Waive Criteria
It is possible to exclude Agency Sales from fees such as Ticket Commission and Transaction Commissions.
-
Follow the steps to exclude Agency Sales from Ticket or Transaction Commissions
To do this, you will need to have an Attribute or Tag set up to identify Agent customer records. With this in place, go to the Admin Interface > Pricing > Ticket Commissions or Transaction Commissions.
Select the Commission structure you wish to edit.
When you are in the Basic Details tab, click Next to go the Waive Criteria tab.
Select the criteria by which you can identify and exclude Agents. For example, you might choose Tags: Agent.

Delivery Methods
Next, choose the delivery method. The Agent is responsible for getting the tickets to the Customer. It’s up to the Agent whether this is via E-Tickets, Post, SMS, etc. You do not receive a copy of the tickets provided by the Agent, but if required you can re-print the tickets generated from the Order in Spektrix.
If you wish to send the barcodes for the tickets to the Agent, you can send these in bulk by using a Sales Report. Otherwise, you can select Print at Home and choose not to print the Order.
Order Attributes
When working with Agencies Offline, all transactions are processed under the Agent Customer Record which means that customer information is not collected. You can choose to manually attach customer information to each Order by creating and using an Order Attribute.
For example, you could set up an Order Attribute called Customer Name as a Text Field. When processing the Orders, you can then use this Text Field to enter the Customer's name as the value.
Orders can be searched for using the Order Attribute value by going to Order Search and clicking the + icon to expand the advanced search function:
In the Order Attributes search box, enter the Attribute value (for example, the customer name):
Payments
Finally, proceed to make a Payment.
The Agent will process all of the payments made by customers. You will need to invoice the Agent for the number of tickets they have sold on your behalf. How often you exchange funds will be determined by your agreement with the Agent.
When processing this transaction, typically you might choose to charge this to a custom payment type, although you can use any payment method available.
Setting up custom payment types of ‘Agent Invoice’ and ‘Agent Invoice Refund’ can be useful as they won’t impact other financial reporting. You could then also use ‘Agent Invoice Refund’ to process any mark backs.
Mark backs and Returns
When working with an Agent Offline, you’ll need to agree with the Agent how soon near the Instance start date / time you are happy to receive returns. When an Agent returns tickets that they have been allocated these can sometimes be referred to as mark backs or charge backs.
To process any returns, you’ll need to remove the tickets from the original Order. Use a payment type which corresponds to the original payment type. For example, if you are using custom payment type of ‘Agent Invoice’, you’ll want to process this as ‘Agent Invoice Refund’. This means that the Agent won’t be invoiced for these tickets.
You will also need to remove the Locks from any seats which are returned to you. This is so that they can be sold as normal alongside your general allocation.
Further Reading
Next, you’ll want to take a look at Reporting for Agencies to learn more.