Segments are groups of customers put together based on information that they have in common.
You can use segmentation in Customer Lists to deliver targeted communications to specific groups, or, to identify certain customers with Auto Tags.
In this article, we’ll cover:
- What are Global and Local Segments?
- Segment Types
- How to create a new Segment
- The Segment Builder Wizard
- Using Segments in Customer Lists
- How to Edit Segments
- Audit trails
Before reading this article, you may find it helpful to watch the video in Understanding Segments and Customer Lists.
What are Segments?
Segments are groups of customers based on shared characteristics.
Segments can be used to define which customers should be included in Customer Lists and Auto Tags.
There are two kinds of Segments available: Global Segments and Local Segments.
Global Segments are available across all Customer Lists while Local Segments are only available within the specific Customer List or Auto Tag which they were created.
Global Segments
Global Segments can be created and edited in Insights & Mailings > Customer Lists > Segment Explorer.
To create and edit Global Segments, you’ll need the Insights & Mailings Administrator role.
- Global Segments can only be used in Customer Lists.
- Global Segments are available to be used across all Customers Lists.
- Any changes made to a Global Segment will affect all the Customer Lists using that Segment.
- You should use Global Segments for those Segments that you'll use over again across multiple Lists. For example, current staff members.
- Global Segments are not available when building Auto Tags.
Local Segments
Local Segments can be created during the process of setting up a Customer List, or an Auto Tag.
To create Customer Lists you’ll need the Insights & Mailings user role.
To create Auto Tags you’ll need the General Administrator role.
- Local Segments will only ever be available in the List or Auto Tag they were created in and any changes made will only affect that Customer List or Auto Tag.
- In Customer Lists, you'll use Local Segments for more specific criteria. For example, Donated £5+ This Year.
Segment Types
In both Global and Local Segments, there are a number of different Segment Types.
- Booking: extract customers based on tickets (for future and past events) which are paid for or reserved. For example, customers who have tickets for more than one Event in a set time frame or customers who have tickets for specific Events.
- Customer: extract customers based on their personal details. For example, customers who live in a particular postcode district or customers who have agreed to receive emails.
-
Marketing: extract customers based on whether they have been included in your mailings and how they have engaged with marketing emails. For example, customers who received a pre-show email or customers who clicked a particular link in a marketing email.
TIP: If your organisation sends out a lot of mailings we always recommend adding a filter such as a date range alongside your Mailings metric to limit the number of results.
- Purchasing: extract customers based on items purchased. For example, customers who made a donation yesterday or customers who have bought three or more merchandise items.
- Ticket Vouchers: extract customers based on Ticket Subscription vouchers that they have purchased, and the status of these vouchers. For example, customers who bought at least one subscription to the current season or customers who haven't used all of their vouchers yet.
If you use the Opportunities Interface, you'll also have the following additional Segment Types available:
- Opportunity: extract customers based on the Opportunities you have open with them. For example, customers who have open Opportunities at the Ask stage or customers who have open Opportunities owned by a particular member of staff.
- Invitee: extract customers based on their Invitations to fundraising events. For example, customers who have been invited to an upcoming gala event.
- Attendee: extract customers based on whether they were marked as having attended fundraising events. For example, customers who attended last year's gala.
- Relationship: extract customers based on their relationship to other customers. For example, customers who have a Sibling relationship with another customer or customers who have a relationship with another customer with an End Date of next year.
- Soft Credit: extract customers based on purchases that have been soft credited to them. For example, customers who have donated above a certain amount or donations soft credited to them.
How to Create a new Segment
Depending on whether you're creating a new Global Segment or a new Local Segment, you'll need to follow different steps.
How to Create a Global Segment
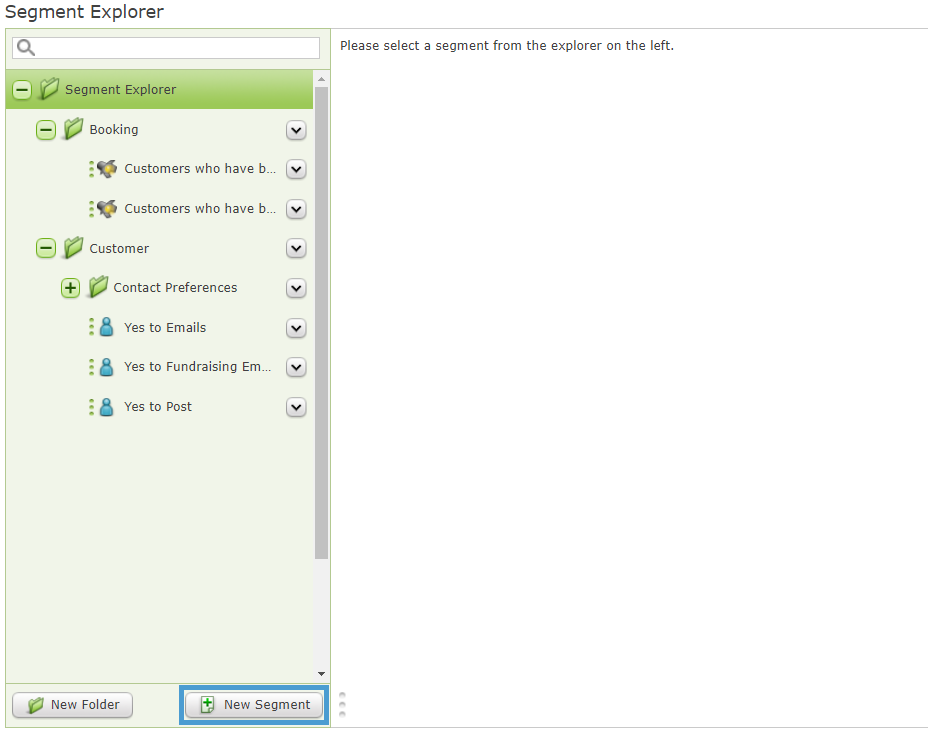
Global Segments are created in Insights & Mailings > Customer Lists > Segment Explorer.
The Segment Explorer lists all of the Global Segments currently available on your system.
TIP: You can organise your Global Segments by dragging and dropping them into the folders in the same way as the Customer List Explorer, or the Report Explorer.
Select the folder in which you wish to create the new Segment and click the New Segment button.
Follow the steps in the Segment Builder Wizard to continue.
How to Create a Local Segment in Customer Lists
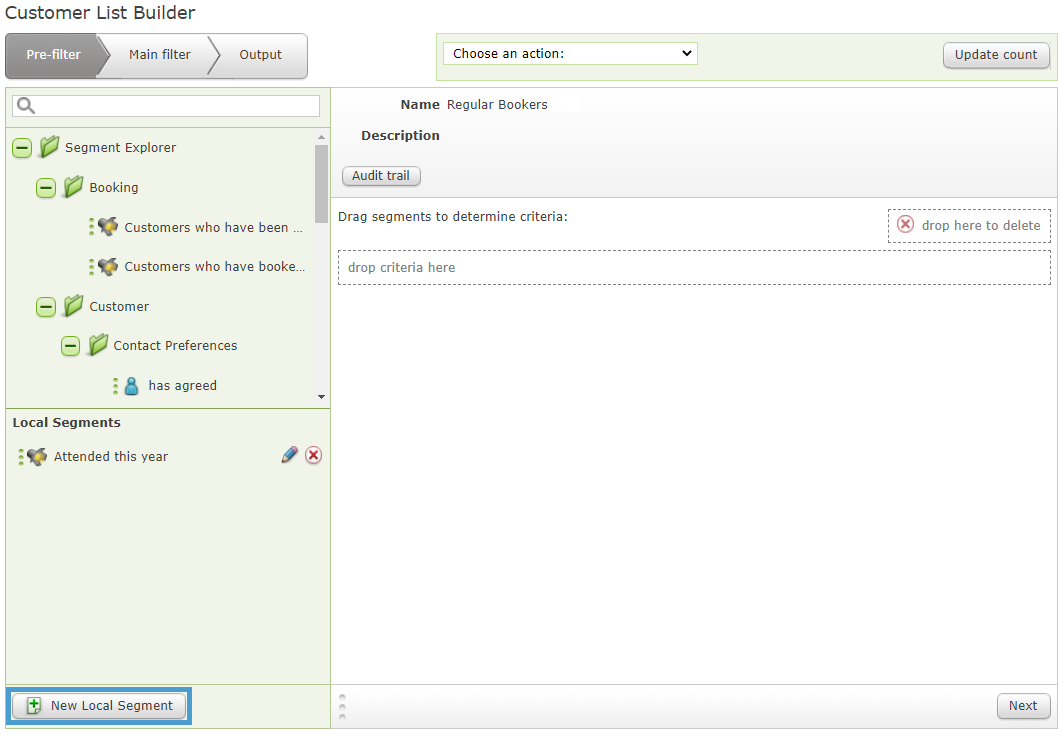
To create a Local Segment, go to Insights & Mailings > Customer Lists and create a Customer List or edit an existing one.
In the bottom left-hand side of the List Builder, in the Local Segment section, click the New Local Segment button.
Follow the steps in the Segment Builder Wizard to continue.
How to Create a Local Segment in Auto Tags
When creating an Auto Tag, go to Admin Interface > Customers > Tags.
In the bottom left of the Auto Tag Builder, click the New Local Segment button.

Follow the steps in the Segment Builder Wizard to continue.
The Segment Builder Wizard
When the Segment Builder Wizard opens, you should see a screen like this.

- Give your Segment a clear and descriptive name. This is particularly important for Global Segments which you intend to use multiple times.
- Choose the Segment Type.
Once you've chosen a Segment Type, next you'll be shown a list of Metrics which can be used to specify the criteria for the Segment.
TIP: Always uncheck the Only show commonly used criteria box to see all of the available Criteria.
In this example, we have chosen a Booking Segment and expanded the Event Instances wrapper to show the available Metrics.

- Drag the Metric you want into the dotted area marked Drop to add to criteria.
- The options for that Metric will appear in the criteria area – these will differ depending on the metric selected. For example, if you choose the Date Transaction Confirmed Metric you will need to specify the date range you want to search for.
- Once you have one Metric you can add multiple Metrics using the AND, OR and NOT rules. To find out more about how to combine Segments and/or criteria within a Segment using the AND and OR rules, read our article on the Customer List Builder.
REMINDER: To be included in a Segment, the customer must meet all of the criteria specified.
-
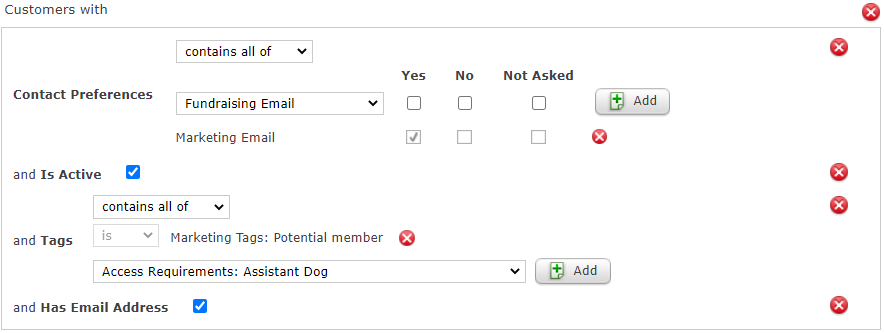
You can make your Segments as simple or as complex as you wish. For example, you could create three individual Customer Segments that find customers who have agreed to email contact, have an email address, and have a Tag that marks them as a potential member.
Alternatively, as these are all criteria that are held at the level of the customer record, you could create a single Customer Segment that finds customers who meet all three criteria using the AND rule.
- Once you've added the Metrics you require, click Next (or OK in a Customer Segment).
- Depending on which Criteria you have chosen, you may see another screen where you can further define your Segment.
- Once you are happy with your Segment settings, click Save.
-
Using Attributes in Customer Lists
As Attributes are held against multiple in Spektrix, you can use them to find customers to add to Customer Lists.
Let's say you want to make a List of all customers who have a particular Attribute against their record.
- Start by creating a new Customer Segment then opening the Individuals wrapper. Here you'll find customer Attributes.
- Drag the Attributes metric into the dotted area marked Drop to add to criteria.
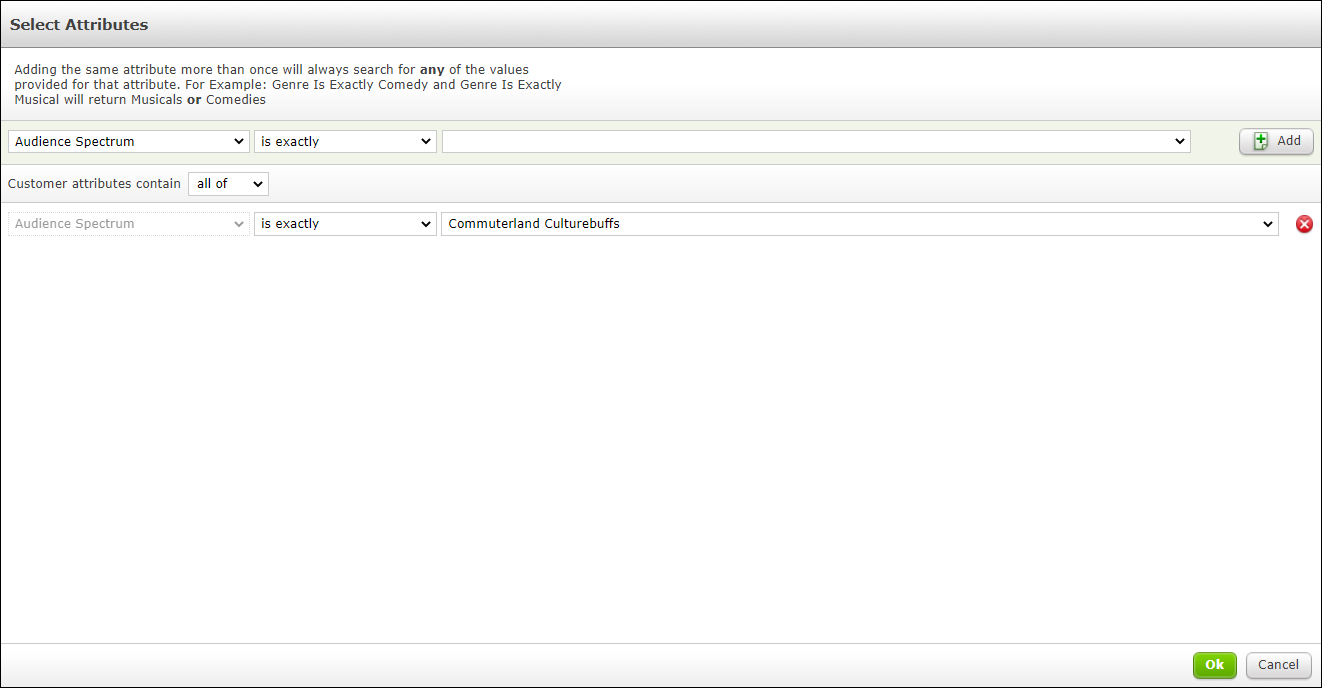
- This will open the Attribute Selector, where you can select the specific Attribute value from the first drop down menu.
- Depending on the type of Attribute, you can choose whether the customer is exactly, is not exactly, starts with or does not start with that value from the drop down.
- Click Add and this Attribute and value will be added.
-
You can then choose whether you want to include All of, None of or Some of the Customers.
- Select Ok to move on to the Edit Segment page
- You can then edit this Segment further, or just click Save and add it to your Customer List as is.
TIP: You can use multiple Attributes in the same Segment to hone your results down further.

How to define your Segment
Within the Segment Builder Wizard, after you have selected your Criteria you may be presented with another screen where you can further define your Segment. These are optional parameters which will help narrow down your selection.
In this section we’ll cover the common types of Segments and ways in which you can specify the detail within the Criteria.
-
Booking Segments
In Booking Segments you will be given the following options to further specify the Segment.
- When data is grouped by: This dropdown will allow you to group the data by Order owner, Order facilitator or Household.
- Included in Segment: When grouping data by Household, this dropdown will appear. Select if only the Primary Householder or all Household members should be included. For more information, read Households in Customer Lists and Auto Tags.
- Number of events attended: this is the number of past, present or future Events that the customer has booked from within the defined Events. This is Events not Instances and therefore would only count once for each Event . Number of events attended must be a minimum of 1.
- Number of event Instances attended: this will register if the customer has attended multiple past, present or future unique Instances of the same Event specified within your chosen Criteria. Number of event instances attended must be a minimum of 1.
- Number of tickets booked: this will include tickets booked for Events in the past and in the future. Number of tickets booked must be a minimum of 1.
- Group size: this will allow you to specify the number of tickets bought together for the same Event Instance.
- Value of tickets booked: this is the cumulative value of tickets booked for each customer all time.
- Days booked in advance: the number of days before the Event Instance the customer booked in advance.
- Sales channels used to include: choose to include or exclude Web, Counter or Phone Sales.
- Items to include: choose to include or exclude Tickets or Reservations.
- Offers: choose to limit the Segment based on Offers.
- Ticket types: choose to limit the Segment based on Ticket Types.
- Price bands: choose to limit the Segment based on Price Bands.
-
Marketing Segments
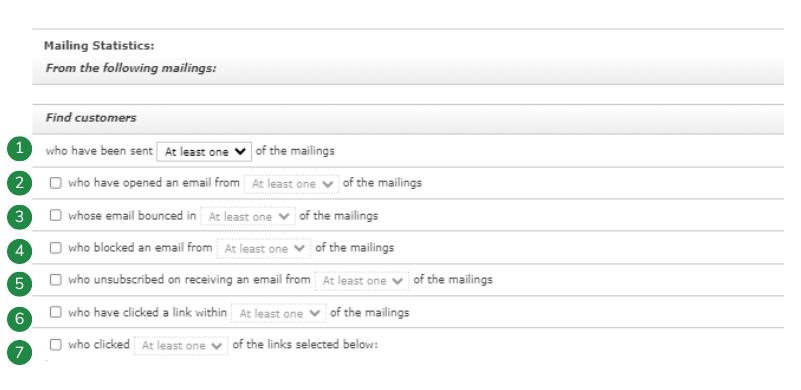
In Marketing Segments you will be given the following options to further specify the Segment in relation to Integrated Mailings.
REMINDER:An Integrated Email will only appear to be segmented once it has been sent.
- Who have been sent At least one of the mailings: choose to include customers who have been sent at least one or all of the mailings.
- Who have opened an email from At least one of the mailings: check this box and select from the dropdown to include customers who have opened at least one, all or none of the mailings.
- Whose email bounced in At least one of the mailings: check this box and select from the dropdown to include customers whose email bounced in at least one, all or none of the mailings.
- Who blocked an email from At least one of the mailings: check this box and select from the dropdown to include customers who blocked an email from at least one, all or none of the mailings.
- Who unsubscribed on receiving an email from At least one of the mailings: check this box and select from the dropdown to include customers who unsubscribed on receiving at least one, all or none of the mailings.
- Who have clicked a link within At least one of the mailings: check this box and select from the dropdown to include customers who clicked a link within at least one, all or none of the mailings.
- Who clicked At least one of the links selected below: check this box and select from the dropdown to include customers who clicked specific links within at least one or all mailings. A list will populate of all the links included in your selected mailings.
-
Purchasing Segments
In Purchasing Segments you will be given the following options to further specify the Segment.
- When data is grouped by: This dropdown will allow you to group the data by Order owner, Order facilitator or Household.
- Included in Segment: When grouping data by Household, this dropdown will appear. Select if only the Primary Householder or all Household members should be included. For more information, read Households in Customer Lists and Auto Tags.
- Total number of items purchased: choose to limit based on a minimum and maximum number of items purchased. Number of items purchased must be a minimum of 1.
- Total value of items purchased: choose to limit based on a minimum and maximum value of items purchased.
How to Use Segments
- For more info on how to use Segments in a Customer List, read our article on the Customer List Builder.
- For more information on how to use Segments in Auto Tags, read our article on Normal Tags and Auto Tags.
How to Edit Segments
It is possible to make changes to Segments after they have been created. Follow the different steps below to edit a Global Segment or a Local Segment.
How to Edit a Global Segment
Global Segments can be edited from the Segment Explorer.
- Select the Segment in the Segment Explorer pane and the details will appear in the right-hand pane.
- Make your changes as required.
- Select OK to save.
REMINDER: Remember that changing a Global Segment will cause it to change everywhere it is being used.
You can see which Customer Lists a Global Segment is being used in by clicking Usages in Customer Lists.

To delete a Global Segment, open the drop down next to its name in the Segment Explorer and then click Delete.
You cannot delete a Global Segment that is in use in any Customer Lists.
How to edit a Local Segment
Local Segments can be edited in the Customer List or Auto Tag.
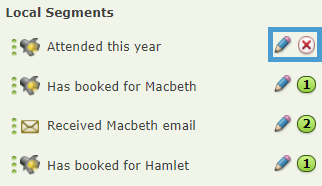
- Select the blue pencil next to the Segment name in the explorer and the details will appear on the right.
- Make your changes as required.
- Select OK to save.
Any updates to a Local Segment will apply to the Customer List where it is being used.
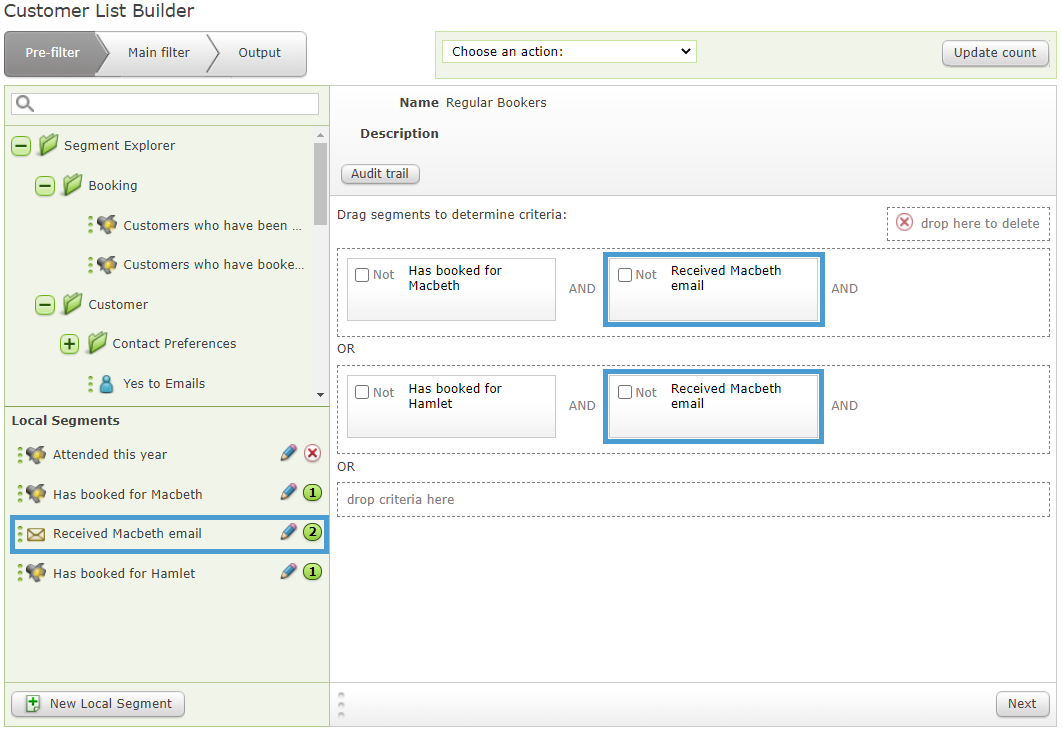
If the Segment is in use in the Customer List, you'll see a number in a circle next to it that shows you how many times it appears.
In this example, we're using this particular Marketing Segment twice, so this is reflected next to the Segment in the Local Segment pane:
Like Global Segments, you cannot delete Local Segments when they're in use in a List or Auto Tag. If a Local Segment is not in use, you can delete it by selecting the red x button.
Audit trails
Audit trails are held against Global Segments.
Audit trails show the date and time of any changes made alongside the user who made the changes. The Audit trail does not show the detail of what changes were made but creates a record any time an update is made.
To see the Audit trail, select the Segment in the Segment Explorer pane and the details will appear on the right. You can then select Audit trail to see this information.
You can then choose whether to view the audit in order of the most recent changes first, or the oldest.

Further reading
To continue learning about Understanding and Using Customer Data in Spektrix, we recommend the following articles on the Support Centre.